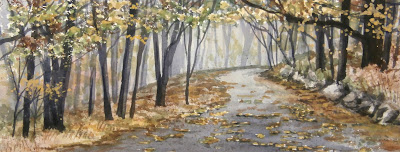
This is a small (12"x4") demo painting I did for my classes this week and below is the lesson I prepared for my students. If you are a painter, give it a try!
 |
| Add caption |
This lesson involves creating a misty or foggy background by using a technique I learned from the book “Zoltan Szabo’s 70 Favorite Watercolor Techniques.” The “fog” is created by flooding a wash of titanium white watercolor over the background. There are other ways to create fog, of course, but this is a useful technique which can also come in handy to “fix” paintings that don’t quite meet your expectations.
A few general notes: 1) I used masking fluid to preserve the foliage at the top of the painting and a few leaves on the road, but you could easily paint around those shapes or blot them out if you don’t have masking fluid; 2) I use a hair dryer to speed up the process, but if you prefer, you can let the painting dry naturally between steps; 3) The specific colors I used were by M. Graham, including cobalt blue, burnt sienna, new gamboge, sap green, naphthol red, and burnt umber. However, you could substitute any similar colors you might have; 4) I created the fog effect in Step 7 by covering the background with a wash of M. Graham Titanium White Watercolor. Chinese white or zinc white will also work, but don’t use white gouache … it is too opaque and chalky.
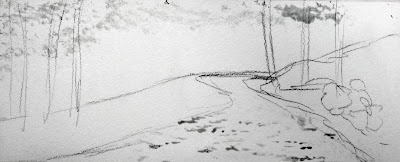 |
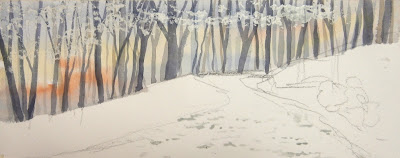
Step One …. Lightly draw the horizon line, the road, and a few trees. Use masking fluid to preserve the foliage at the top of the painting and a few leaves on the road. Hint: I used a torn piece of soft sponge to mask the foliage. Dampen the sponge, dip it in a shallow puddle of masking fluid, and lightly tap it along the paper, turning it at various angles so you don’t get the same shape each time you tap. Dry the masking fluid before proceeding.
|
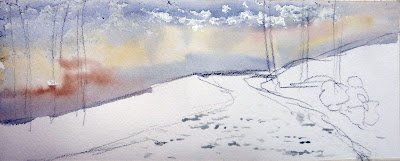 |
Step Two … Prepare separate puddles of medium-strong blue, yellow, orange and green. Wet the background above the horizon and drop in random strokes of the colors prepared. Don’t over-mix; let the colors blend on the paper. Don’t worry if they seem a little strong; they will dry lighter and they will also be toned down in Step Seven when we paint the fog. After the colors have blended, dry the painting.
|
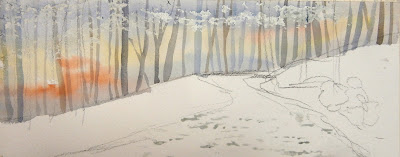 |
Step Three … Prepare light washes of blue/gray and brown/gray. (I used mixes of cobalt blue with burnt sienna and burnt umber). Working on dry paper, paint the lightest background trees. Dry the painting.
|
 |
Step Four …. Add a little more pigment to the washes in the previous step, and paint more trees with darker values in front of the light trees. Dry the painting.
|
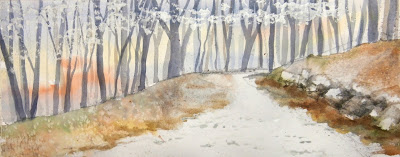 |
Step Five …. Paint the foreground as follows: Wet the left side and drop in soft browns, oranges, greens, yellows, etc. to create the fallen leaves on the ground. Use a tooth brush to spatter some darker colors into the wash while it is wet. You can also sprinkle in a little bit of table salt for texture. Wet the right side of the foreground and repeat the same process. (Optional: I added a stone wall by dropping in darker grays and browns and scraping out the rock shapes with a piece of an old credit card.) Use some burnt sienna to define the fallen leaves along the edges of the road. Dry the painting.
|
Step Six … Wet the road and paint it with a graded wash of blue/gray, keeping it light in the distance and adding stronger color toward the bottom of the painting. Use a toothbrush to spatter in some darks to create texture. Dry the painting very thoroughly.
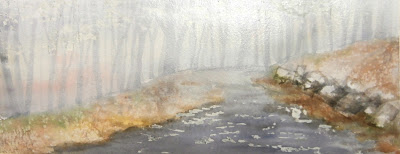
Step Seven …. This is where we create the fog. Note: It is a good idea to practice this technique on an old painting or on a scrap before you do it on your painting :) ) Prepare a wash of titanium white watercolor (NOT gouache!) that is about the consistency of light cream. Make sure to mix well so that there are no lumps of white pigment in the wash. Also, make sure you prepare enough white, since you make need to use two coats to get the effect of fog. The amount you need depends on the size of your painting. Mine was quite small (12”x4”). When your white is ready, gently wet the entire painting with a soft flat brush or mist it with a spray bottle. Use a large flat brush to apply the white over the whole background and slightly into the top edges of the foreground. Use gentle strokes, and do not scrub, or the background colors will lift and combine with the white. Use a dry paper towel or tissue to lightly blot the white along the bottom edge, where the foggy background meets the foreground. At first the white will look really thick and opaque, but the background will gradually emerge as the white dries. Dry the painting.
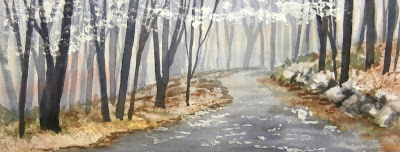
Step Eight: Use some rusty browns to lightly define the top edges of the foreground. Mix some medium-dark washes grays and browns and paint the foreground trees. Add as much detail as you wish. Mine was so small I didn’t add bark texture, etc. If you added a stone wall in Step Five, add shadows and details to the stones.
Step Nine: Remove the masking fluid and paint the foliage at the top of the painting with various yellows, greens and rusts. Paint the fallen leaves on the road the same way, and add tiny shadows below them to “set them down” Add as much detail as you want to the woods on both sides of the road, I.e. grasses, bushes, etc. That’s it! You are done.


